LEGO Indiana Jones 2 - Controls and Menus
In case you've misplaced your instruction manual or bought/rented a used game that didn't come with a booklet, here's a list of the basic controls for all systems. The early levels of the game include tutorials for all controls, and my walkthroughs have tips for sections where the new controls are introduced.
PDF instruction manuals for some versions of the game can be found on the Downloads page.
If anyone can share a list of Macintosh controls, I'd be grateful.
| Control | PC Player 1 | PC Player 2 | PS3 | PSP | Wii | Xbox 360 |
|---|---|---|---|---|---|---|
| Move, Steer, Aim | W/A/S/D | Arrow Keys | Left Analog Stick | Analog Stick/D-Pad | Control Stick | Left Analog Stick |
| Jump/Select Menu Item | U | Num 5 | X | X | A | A |
| Use, Switch Weapon or Tool | J | Num 2 | Circle | Circle | Z | B |
| Go Back/Cancel | J | Num 2 | Circle | Circle | B | B |
| Attack, Target (hold) | H | Num 1 | Square | Square | Swing Remote/B | X |
| Free Tag, Get on/off Vehicle or Animal | K | Num 3 | Triangle | Triangle | C | Y |
| Toggle Characters (Free Play) |
Left Ctrl/Space | Right Ctrl/Num 0 | L1/R1 | L/R | 1/2 | LB/RB |
| Pause | Escape | Num Enter | Start | Start | + | Start |
| Join/Leave Co-op Game* |
— | F2/Enter | Start | Start | + | Start |
*To Join or Drop Out of a Co-op Game: In the the PC version, press F2 on the keyboard to join. To drop out, press the Enter key and select Drop-Out from the Pause menu. On the consoles, press the Start button on the second controller (+ on the second Wii controller) to join. To drop out, press the same button again and choose Drop Out from the Pause menu.
Playset Menu
LEGO Indiana Jones 2 includes seven hubs, known in the LEGO world as playsets. These are lined up in the main menu. Only one playset, Kingdom of the Crystal Skull Part 1, is accessible at the start, but you'll unlock the others as you progress. Playsets that are still locked appear as plain wooden crates in the main menu.
The first time you open a playset, most of the icons in the Playset Menu are dark. Your only options are to "Start Story" or back out of the playset. Once you've started exploring, however, the Playset Menu becomes more useful.
Here's a screen cap of the Kingdom of the Crystal Skull Part 1 Playset Menu.
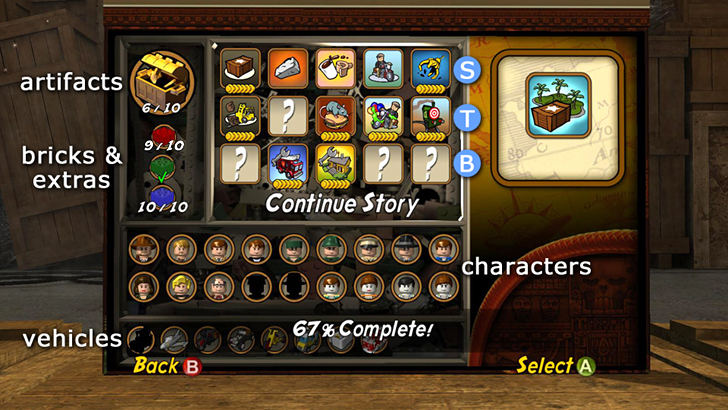
Top Left: The treasure chest shows Artifacts found so far (out of a possible 10). Below that are the Colored Bricks found so far (out of a possible 10 of each color). When checked, this means you've found all of that color and purchased the Extra that goes with it.
Top Middle: The three rows of icons represent the Story (S), Treasure (T) and Bonus (B) levels in this hub. Completed levels have a colored icon. Levels you haven't played yet have a question mark. If you've achieved True Adventurer for the level, its icon will have a line of gold studs at the bottom.
When you open a playset where you've already explored, "Continue Story" is selected by default. Press the button indicated on screen to return to the hub map and continue where you left off. Or move the cursor around the icons for the Story, Treasure and Bonus Levels to select a level to replay in Time Trial mode. Time trial levels are the same as the original version but you can try to beat your best time or go for True Adventurer if you missed it before.
Top Right: When you highlight one of the level icons, this space will show your best time for that level.
Bottom: These are the icons for the Characters and Vehicles you've unlocked so far. A dark silhouette means you haven't unlocked that one yet. The text shows how close you are to 100% completion for this playset.
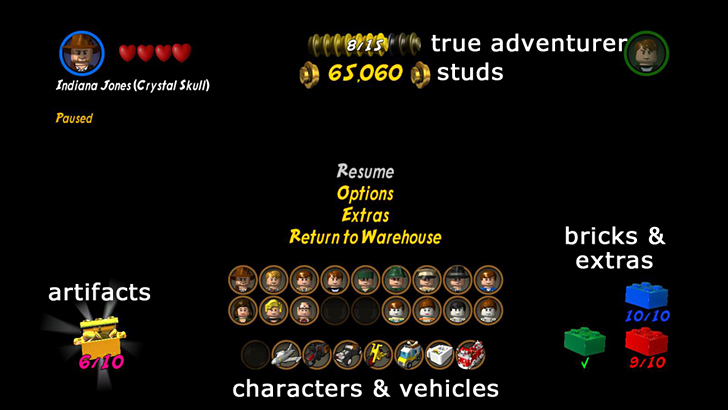
Pause Menu
The menu that appears when you pause the game is similar to the Playset Menu (above). The top center of the screen shows your progress toward achieving True Adventurer in all the levels in this hub, as well as how many studs you have to spend right now.
| < < < Introduction | Top of Page | Characters > > > |